What a Home Energy Assessment Is and Why It Matters
A home energy assessment, often called a home energy audit, is a structured review of how a house uses energy, where it is lost, and how comfort and efficiency might be improved. In a typical assessment, an energy professional or trained technician examines the building shell, heating and cooling equipment, lighting, and major appliances, using visual checks and basic testing tools. The aim is to identify practical ways to cut waste while keeping the home safe and comfortable. When combined with simple energy usage monitoring, such as comparing utility bills across seasons, the assessment helps show how much energy major systems use and where small changes could have a noticeable effect.
For many households, the main value of an energy audit is clarity. It turns vague worries about high bills or uncomfortable rooms into specific, prioritized suggestions, which can guide decisions about steps like sealing air leaks or replacing outdated equipment when it is already nearing the end of its life. An assessment still has limits. It cannot promise future bill reductions because outcomes depend on energy prices, local weather, and how people operate their homes. Some improvements also involve upfront costs, professional work, permits, or inspections. Recognizing both benefits and constraints helps homeowners treat the assessment as one input for long term maintenance and efficiency planning.
Key Components of a Professional Home Energy Audit
A professional home energy audit usually starts with a short interview and visual walkthrough. The assessor reviews recent energy bills and asks about comfort issues such as drafts, cold spots, or rooms that overheat. They note the age and condition of windows, doors, heating and cooling systems, and major appliances. This opening step highlights likely paths for household heat loss and clarifies limits of the visit, such as avoiding work on hidden wiring, gas lines, or other elements that require separate licensed specialists.
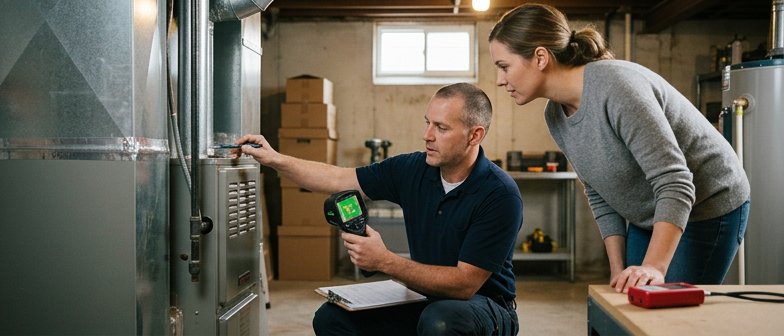
The core of the audit examines how well the building shell controls air and heat flow. For air leakage detection, auditors often use a blower door to gently pressurize or depressurize the home and then look for drafts around trim, fixtures, and other openings, sometimes using smoke or infrared tools. They combine these tests with insulation inspection in attics, basements, crawlspaces, and accessible walls, checking for bare spots, gaps, or compressed insulation that reduce the effectiveness of the thermal barrier without removing finished surfaces.
Many visits also include simple energy usage monitoring to support practical advice while staying within safe practice. The assessor may record room temperatures, thermostat settings, and basic information about heating and cooling run times instead of performing invasive electrical checks or adjusting fuel-burning equipment, which are left to licensed technicians. At the end, they summarize the main issues and propose a ranked list of actions, often organized with a home efficiency checklist covering air sealing, insulation, equipment maintenance, and everyday habits.
| Audit Stage | Main Focus | Typical Tools | Homeowner Role |
|---|---|---|---|
| Initial walkthrough | Comfort concerns, obvious heat loss | Questionnaire, visual checks | Describe drafts and problem rooms |
| Air leakage testing | Draft paths and shell leaks | Blower door, smoke, infrared | Stay clear of equipment, note trouble spots |
| Insulation review | Gaps and weak thermal barriers | Flashlight, access panels | Allow attic/basement access |
| Usage monitoring | Temperature and run-time patterns | Thermometers, simple logs | Share bills and thermostat habits |
| Final summary | Priority efficiency actions | Written checklist | Review recommendations and plan next steps |
How Auditors Detect Air Leaks and Heat Loss
During a Home Energy Assessment, auditors begin with a visual check for gaps around windows, doors, attic hatches, and utility penetrations. Simple diagnostic tools such as smoke pencils help show where air moves. A blower door test depressurizes the house so outside air is pulled through cracks, making hidden leaks easier to spot. Infrared cameras can reveal cold or hot areas on walls and ceilings where outside air enters or insulation is missing.
To understand how a home loses heat, auditors combine these tests with temperature readings, insulation inspections, and observations of how rooms feel during normal use. They may note drafts, uneven room temperatures, or surfaces that stay unusually cold or warm. Test accuracy can be affected by wind, recent weather, or heavy furnishings that hide problems. For safety, energy assessments stay non‑destructive and avoid invasive electrical or gas work, so some issues are left for licensed contractors.
DIY Checks and Inspections You Can Do Safely
A practical home efficiency checklist can start with a slow walk through each room. Notice where you feel drafts, where temperatures differ from one space to another, and whether condensation appears on windows. On a cold or windy day, lightly run your hand around window frames, baseboards, and exterior doors to find cold spots. A small strip of tissue held near suspected gaps can show moving air. These simple observations highlight likely heat loss and air leakage and help you decide where a more detailed home energy assessment or audit could add value.
For a basic insulation inspection, limit yourself to areas that are easy and safe to see. In an attic with stable flooring and good lighting, look for even coverage rather than bare, thin, or compressed patches, and note where stored items block insulation. Along exterior walls, outlets or switches that feel noticeably cooler in winter or warm in summer compared with interior walls can suggest missing insulation. In dry basements or crawlspaces that are simple to enter, exposed rim joists and bare foundation walls are common weak points. Avoid disturbing anything damp, moldy, damaged, or near wiring, recessed lights, or unknown materials; those issues should be assessed by a qualified professional.
Energy usage monitoring can be done without opening panels or altering equipment. Comparing monthly utility bills across seasons shows how heating and cooling affect total consumption and can reveal unusual changes that do not match weather trends. Some households check electric or gas meters at the same time each week to see how habits such as thermostat adjustments or air-drying laundry influence use. For individual appliances, simple plug-in monitors, used only as the instructions specify, provide a non-invasive way to see which devices draw the most power. These safe checks do not replace a full home energy audit but offer useful insight into where energy is going and where modest changes may improve comfort and efficiency.
Using a Home Efficiency Checklist Step by Step
A practical checklist helps you move methodically through each room instead of relying on quick impressions. Start with one area and look for drafts at windows and doors, gaps where pipes or cables enter, and signs of moisture or temperature swings. Record what you notice about room conditions, visible insulation, and thermostat settings so you can later compare your notes with findings from a Home Energy Assessment.
When rooms are covered, repeat the checklist for systems that affect comfort and energy use, such as heating, cooling, ventilation, and lighting. Without opening panels or touching fuel lines, you can still note equipment age labels, filter condition, and how often systems run. Include brief comments on how each space feels at different times so a future Home Energy Audit can focus on the most persistent issues.
Interpreting Results and Planning Upgrades
Once a Home Energy Audit or your own inspection is complete, the main task is to turn the findings into a clear picture of how your home uses and loses energy. Reports typically show where household heat loss is concentrated, such as through the attic, exterior walls, or poorly sealed doors and windows. They often describe insulation problems, note areas that could not be inspected safely, and estimate potential savings for different improvements. It can be useful to group the results into themes such as building shell issues like drafts, comfort concerns like uneven temperatures, and cost drivers such as older equipment, so patterns become easier to see.
When planning upgrades, many households first choose relatively low cost steps that reduce drafts and improve insulation where access is practical. Sealing noticeable leaks around windows, doors, and accessible rim joists, or adding insulation in open attic areas, is often considered before replacing major heating or cooling equipment, because better insulation can improve comfort and may allow future systems to be sized more modestly. At the same time, some walls or floors may be difficult to open, historic details may constrain changes, and budget or schedule may limit projects. Work on electrical panels, gas lines, or complex mechanical systems should be left to qualified contractors, and improvements are best viewed as gradual gains rather than instant transformations.
Q&A
-
What is a Home Energy Assessment?
It is a structured review of how a home uses energy, usually done by a trained assessor using tools such as blower doors or infrared cameras. A quick DIY walk‑through relies on simple observation and is less detailed. -
How does an audit find where heat is lost?
The assessor checks attics, walls, windows, and doors, looking for missing insulation and drafts. They may also review past energy bills to see patterns that point to major heat‑loss areas. -
Which methods are used to detect air leaks safely?
Common tools are blower door tests, smoke or incense sticks, and feeling for drafts around openings. Work on electrical panels or gas lines is left to qualified tradespeople for safety. -
What can a simple home efficiency checklist cover?
Include each room, noting drafts, temperature differences, window condition, visible insulation, and thermostat settings. Add doors, attic hatches, and pipe or cable penetrations to track issues over time. -
How should I use results to plan upgrades?
Group issues by priority and cost, such as basic air sealing, added insulation, and equipment replacement. Consider budget, safety limits, and local rules, and usually schedule larger projects after sealing and insulation.